
.
Google Apps Script and Custom Form For Google Sheet
This tutorial is based on http://railsrescue.com/blog/2015-05-28-step-by-step-setup-to-send-form-data-to-google-sheets/
Read https://github.com/AishwaryT/Google-app-script-crud as well.
Read https://github.com/AishwaryT/Google-app-script-crud as well.
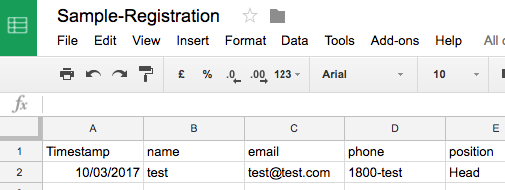
1) Create a new Google Sheet
Create columns as shown below:
Timestamp
|
name
|
email
|
phone
|
position
|

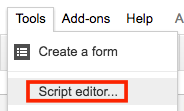
Select Menu/Script editor...
A Script Editor window will be opened in a new browser tab. By default a code file Code.gs is created.
Paste the following code.
// 1. Enter sheet name where data is to be written below
var SHEET_NAME = "Sheet1";
// 2. Run > setup
//
// 3. Publish > Deploy as web app
// - enter Project Version name and click 'Save New Version'
// - set security level and enable service (most likely execute as 'me' and access 'anyone, even anonymously)
//
// 4. Copy the 'Current web app URL' and post this in your form/script action
//
// 5. Insert column names on your destination sheet matching the parameter names of the data you are passing in (exactly matching case)
var SCRIPT_PROP = PropertiesService.getScriptProperties(); // new property service
// If you don't want to expose either GET or POST methods you can comment out the appropriate function
function doGet(e){
return handleResponse(e);
}
function doPost(e){
return handleResponse(e);
}
function handleResponse(e) {
// shortly after my original solution Google announced the LockService[1]
// this prevents concurrent access overwritting data
// [1] http://googleappsdeveloper.blogspot.co.uk/2011/10/concurrency-and-google-apps-script.html
// we want a public lock, one that locks for all invocations
var lock = LockService.getPublicLock();
lock.waitLock(30000); // wait 30 seconds before conceding defeat.
try {
// next set where we write the data - you could write to multiple/alternate destinations
var doc = SpreadsheetApp.openById(SCRIPT_PROP.getProperty("key"));
var sheet = doc.getSheetByName(SHEET_NAME);
// we'll assume header is in row 1 but you can override with header_row in GET/POST data
var headRow = e.parameter.header_row || 1;
var headers = sheet.getRange(1, 1, 1, sheet.getLastColumn()).getValues()[0];
var nextRow = sheet.getLastRow()+1; // get next row
var row = [];
// loop through the header columns
for (i in headers){
if (headers[i] == "Timestamp"){ // special case if you include a 'Timestamp' column
row.push(new Date());
} else { // else use header name to get data
row.push(e.parameter[headers[i]]);
}
}
// more efficient to set values as [][] array than individually
sheet.getRange(nextRow, 1, 1, row.length).setValues([row]);
// return json success results
return ContentService
.createTextOutput(JSON.stringify({"result":"success", "row": nextRow}))
.setMimeType(ContentService.MimeType.JSON);
} catch(e){
// if error return this
return ContentService
.createTextOutput(JSON.stringify({"result":"error", "error": e}))
.setMimeType(ContentService.MimeType.JSON);
} finally { //release lock
lock.releaseLock();
}
}
function setup() {
var doc = SpreadsheetApp.getActiveSpreadsheet();
SCRIPT_PROP.setProperty("key", doc.getId());
}
|
Save.

2) Run Setup
Before deploying the script, we need to run the setup function to register the worksheet id.


To check that the setup process is successful, select menu File/Project Properties.
The Script Properties tab should display the key value.

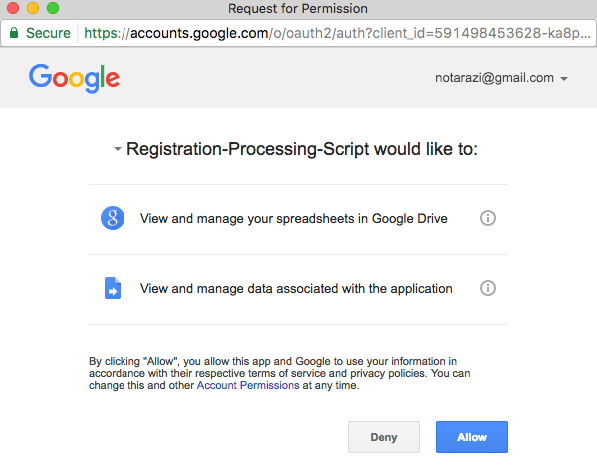
Then, deploy as web app.

Execute the apps as: me.
Who has the access to apps: anyone, even anonymous.

Take note of the web app URL.

Paste the web app URL to the string <YOUR WEB APP URL> in the JS codes below.
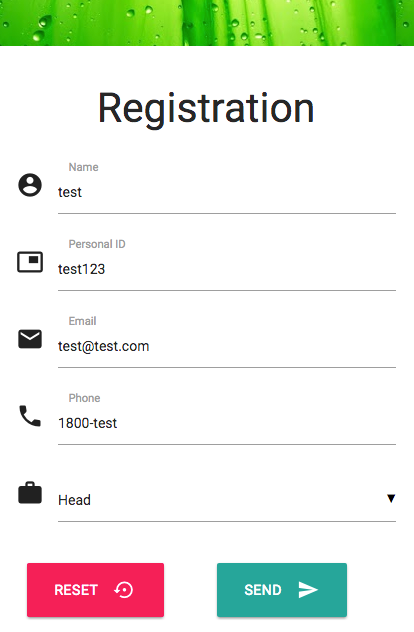
3) Create a new CodePen
HTML
<head>
<!--Import Google Icon Font-->
<link href="http://fonts.googleapis.com/icon?family=Material+Icons" rel="stylesheet">
<!-- Compiled and minified CSS -->
<link rel="stylesheet" href="https://cdnjs.cloudflare.com/ajax/libs/materialize/0.98.0/css/materialize.min.css">
<!--Let browser know website is optimized for mobile-->
<meta name="viewport" content="width=device-width, initial-scale=1.0"/>
</head>
<body>
<div class="waves-light" style="height:50px;background-image: url(https://lh5.googleusercontent.com/NplHsFMjyO6ML5EvR9xHtFi-nxa61W58LE1uaPB_c_VnTtnspJnCOzr9uuHcbTdn_ZNGWW8dJA=w400);
/* background-size: cover; */
/* background-position: center; */
color: rgba(255, 255, 255, 1);"></div>
<div style="padding:20px;max-width:420px;margin:auto;">
<h3 style="text-align:center;">Registration</h3>
<div style="height:10px;"></div>
<form id="register" class="col s12">
<div class="input-field col s12">
<i class="material-icons prefix">account_circle</i>
<input id="name" name="name" type="text" required>
<label for="name">Name</label>
</div>
<div class="input-field col s12">
<i class="material-icons prefix">picture_in_picture</i>
<input id="pidno" name="pidno" type="text" required>
<label for="pidno">Personal ID</label>
</div>
<div class="input-field col s12">
<i class="material-icons prefix">email</i>
<input id="email" name="email" type="email" required>
<label for="email">Email</label>
</div>
<div class="input-field col s12">
<i class="material-icons prefix">phone</i>
<input id="phone" name="phone" type="tel" required>
<label for="phone">Phone</label>
</div>
<div class="input-field col s12">
<i class="material-icons prefix">work</i>
<select id="position" name="position">
<option value="" disabled selected>Position</option>
<option value="Head">Head</option>
<option value="Assistant">Assistant</option>
<option value="Secretary">Secretary</option>
<option value="Others">Others</option>
</select>
</div>
<!-- Future extension
<div class="file-field input-field">
<div class="btn yellow accent-4">
<span>Reference Document</span>
<input type="file">
</div>
<div class="file-path-wrapper">
<input class="file-path validate" type="text">
</div>
</div>
-->
<br/>
<div class="row">
<div class="col s6">
<button class="btn btn-large waves-effect pink accent-3" type="reset" >Reset
<i class="material-icons right">settings_backup_restore</i>
</button>
</div>
<div class="col s6">
<button class="btn btn-large waves-effect waves-light" id ="send" type="submit" name="send">Send
<i class="material-icons right">send</i>
</button>
</div>
</div>
</div>
</form>
</div>
<!--Import jQuery before materialize.js-->
<script type="text/javascript" src="https://code.jquery.com/jquery-2.1.1.min.js"></script>
<script src="https://cdnjs.cloudflare.com/ajax/libs/materialize/0.98.0/js/materialize.min.js"></script>
<script>
$(document).ready(function() {
$('select').material_select();
});
</script>
</body>
|
JS
// Variable to hold request
var request;
// Bind to the submit event of our form
$("#register").submit(function(event){
// Abort any pending request
if (request) {
request.abort();
}
// setup some local variables
var $form = $(this);
// Let's select and cache all the fields
var $inputs = $form.find("input, select, button, textarea");
// Serialize the data in the form
var serializedData = $form.serialize();
// Let's disable the inputs for the duration of the Ajax request.
// Note: we disable elements AFTER the form data has been serialized.
// Disabled form elements will not be serialized.
$inputs.prop("disabled", true);
// Fire off the request to /form.php
request = $.ajax({
url: "<YOUR WEB APP URL>",
type: "post",
data: serializedData
});
// Callback handler that will be called on success
request.done(function (response, textStatus, jqXHR){
// Log a message to the console
console.log("Hooray, it worked!");
console.log(response);
console.log(textStatus);
console.log(jqXHR);
$("#register")[0].reset();
});
// Callback handler that will be called on failure
request.fail(function (jqXHR, textStatus, errorThrown){
// Log the error to the console
console.error(
"The following error occurred: "+
textStatus, errorThrown
);
});
// Callback handler that will be called regardless
// if the request failed or succeeded
request.always(function () {
// Reenable the inputs
$inputs.prop("disabled", false);
});
// Prevent default posting of form
event.preventDefault();
});
|
Test Run.
The console window should display success message.
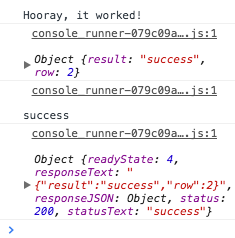
The Google Sheet should contain the new record.
HTML5 Form With App Script Google Sheet: http://codepen.io/notarazi/pen/WppKGe
.
No comments:
Post a Comment