Labels

ionic (40) Google Apps Script (28) Construct2 (6) Google API (5) Google Cloud (5) Java (5) presentation (5) jasper (4) plunker (4) Notepad++ (2) liferay (2) ms access (2) mysql (2) PHP (1) SQLite (1) android (1) blogspot (1) html5 (1) ionic-creator (1) javascript (1) mobile (1) plainjs (1) utilties (1)

Learn the powerful enterprise adaptable database:

Getting Started With ADABAS & Natural

Showing posts with label presentation. Show all posts

Wednesday, January 25, 2017

Download a portable prezi online


.

What can you do with a portable prezi?

  • Present on a Mac or PC without an Internet connection.
  • Burn your prezi onto a CD or DVD.
  • Transfer your prezi to a USB drive.
  • Distribute your prezi to people so they can view it but not change it.
Please note that a portable prezi cannot be edited. If you need to make changes, edit your prezi on Prezi.com or with Prezi Desktop, and export it again. Remember that you must have an active Internet connection to play YouTube videos.

Downloading a portable prezi online

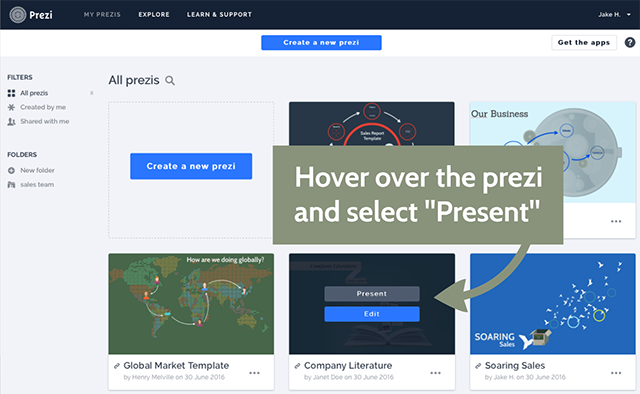
  1. Go to your dashboard. Find the prezi you want to export and hover over it.
  2. Click Present.
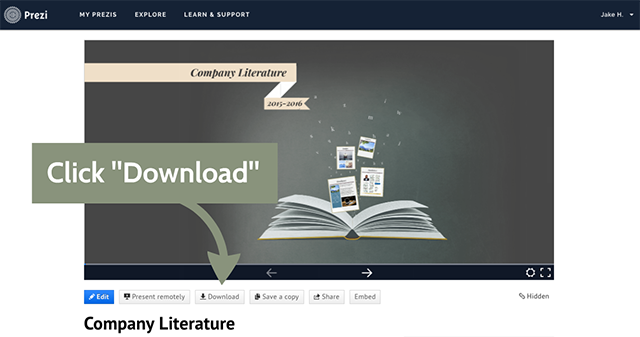
  3. Click Download at the bottom of the prezi. You’ll get a pop-up window with options.
  4. Choose Presenting and click Download. You’ll see the file being downloaded.
  5. Once the download is complete, your portable prezi will be saved in a ZIP file on your hard drive.

Downloading while in the editor

  1. Click on the share icon from the top menu.
  2. Select Download as a portable prezi.
  3. Once the download is complete, your portable prezi will be saved in a ZIP file on your hard drive. Give your portable prezi a name and chose the location you want to save it.

Downloading your prezi for presentation using Prezi Desktop for Windows

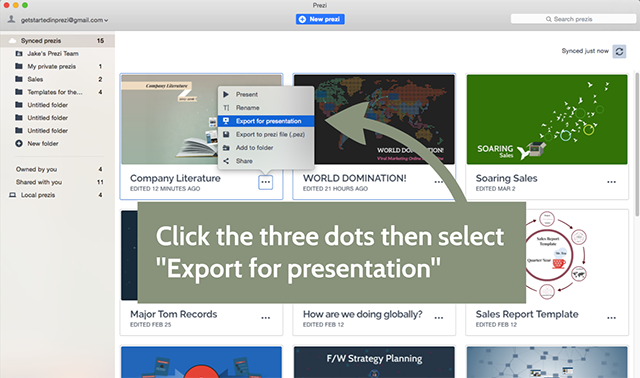
  1. Click the three dots in the lower right corner of the prezi you want to export.
  2. Select Export for presentation.
  3. Check the box next to the operating system you’d like your prezi to run on. If you check both, two separate files will be created.
  4. Click Export.
  5. Select where you want to save the prezi(s) and click OK.

Downloading your prezi for presentation using Prezi Desktop for Mac

  1. Click the three dots in the lower right corner of the prezi you want to export.
  2. Select Export for presentation.
  3. Check the box next to the format you’d like your portable prezi to run on. You can check both, and it will make two separate files.
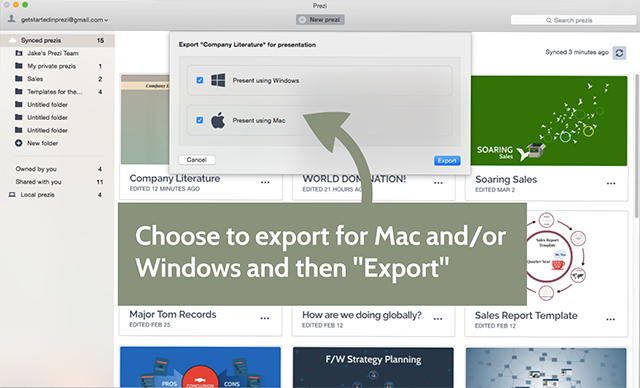
  4. Click Export.
  5. Select where you want to save the prezi(s) and click OK.

Sending a prezi for presentation (portable prezi)

Online

After you’ve downloaded the portable prezi, you’ll see a zipped folder. Simply send the entire zipped folder. Otherwise the recipient will not not be able to view your prezi.
Note: If the folder is too large, you may need a third-party software to attach it to an email.

Prezi Desktop

Send the file that appears after you export the prezi for presentation.
  • EXE→ Windows (If exported with Prezi Desktop for Windows, this will appear with as a Prezi logo)
  • ZIP→ Mac
    Once you’ve exported your prezi for presentation, you can save it to a pen drive or email it to anyone in the world knowing that your prezi will be viewable regardless if the viewer or computer has a Prezi account. If you’re not sure which file format to send, it’s best to send both files.
Also known as the portable prezi, this file is great to send in advance If you’re going to present your prezi at a conference.

Viewing or presenting a prezi for presentation (portable prezi)

Online

  1. Download the zipped folder and unzip the file.
  2. Open the folder and double-click the prezi file indicated by the Prezi logo. Do not remove any files from the zip folder as this will most likely result in the portable prezi not working correctly.
Note: You will need a program that can unzip files.
For more information on viewing and presenting a portable prezi, please check out this article.
.

Tuesday, June 18, 2013

Prezi: How To Collaborate On Presentation


1) Browse URL http://prezi.com/your/

2) Click New Prezi.


3) Choose a Template.
e.g., click "Explain A Topic" and then click "Use Template".


4) Edit the presentation.
e.g. Type a question "Favourite Food?"


5) Invite collaborators.

5.1) Click Share/Invite to edit...


5.2) A Dialog pops up.


5.3) Send your link to your friend, e.g. post the link in FB.

5.4) Wait for collaborators to edit the document.


Prezi: How To Create Remote Presentation


1) Browse URL http://prezi.com/your/

2) Click New Prezi.


3) Choose a Template.
e.g., click "Journey" and then click "Use Template".


4) Edit the presentation.
e.g., tell the viewer about your journey from home to college or workplace.


5) Once you are done, Click Share/Online presentation.


6) Remote Presentation.

6.1) Following the Step 5, a dialog will pop up.


6.2) Copy the link and give it to your remote audience.
e.g.http://prezi.com/g_nrvlqafuro/present/?auth_key=z4bhqkl&follow=7gtmumnmb71j

6.3) Your audience will paste the link to their Web Browser.
e.g.


6.4) Back in your computer, get ready to present.
Notice that the notification message tells you that 1 person is waiting.
Click Start Online Presentation.


6.5) The moment you click the button, your audience will notice it.


6.6) As you navigate the frames, your audience will automatically see the effect.
Notice that there could be a slight lagging between your browser and your audience's browser.


6.7) You can click your avatar and stop the presentation.


6.8) You can also click your guest's avatar to handover the presentation.


If you choose to handover...

6.8.1) Prezi transfer the control to the guest.


6.8.2) The guest then leads the presentation.


7) Once presentation is over, guest will see the ending image.

Prezi: Creating Prezi Sample Presentation


Prezi.com provide an official video at YouTube, https://youtube.googleapis.com/v/ScjACjRUd2A. The screenshot of the video is available athttp://basic-steps.blogspot.com/2013/06/prezi-getting-started.html. This tutorial is an approach to guide the reader to re-create the sample presentation featured in the video. It is applicable to both Desktop and Online version of Prezi application.

1) Create New Prezi.

1a) Go to your Prezi.com account, http://prezi.com/your/
The Online version is as shown below.

Click "New Prezi".


Choose "Challenges, Success". Click "Use Template".


1b) Run your Prezi Desktop software.
The Desktop version is as shown below. Choose "Challenges, Success". Click "Choose".


2) The main application window appears.


3) Save your presentation.


3a) The Online version will save without prompting a file name.

3b) The Desktop version will prompt for a file name, which you may save as "prezi-challenge-success".


4) Prezi Presentation Canvas will fill up the screen.
4.1) Click Allow to allow full screen mode.
4.2) The navigation bar is at the bottom of the Presentation Screen.
4.3) Click the Right Arrow or Left Arrow to move between frames. (Left Arrow is dimmed at the start of the presentation.)
4.4) If you pause for a long time time, the navigation bar will disappear.


5) Navigate the frames.
5.1) Press Right Arrow to go forward to the last frame.


5.2) Press Left Arrow to go backward to the first frame.

5.3) Hover your mouse over the navigation bar, and the slider knob will appear.


5.4) Use the slider to move between the slides.


5.5) Use the Toggle Full Screen button to switch presentation container between computer screen and web browser window.


5.6) Use Autorun button to run the frames automatically.


Select appropriate time interval period.


A setting message information appears for few seconds.


6) View Control Bar.
Hover your mouse towards the right border of the presentation window. A View Control Bar appears.


6.1) Click Zoom-In and Zoom-Out to see the Zoom Effect.

6.2) Click Home to see the Home Effect.

6.3) Click the Close Button to close presentation.

The Presentation Screen is closed and replaced by the Main Application Window.

7) Next Step: Edit your presentation to resemble the sample file as shown at http://basic-steps.blogspot.com/2013/06/prezi-getting-started.html.

7.1) Insert Arrow
7.1.1) Click "Frames & Arrows"/Draw arrow.


7.1.2) Click two points to connect the two cartoon objects
Change the color to match the example at http://imageshack.us/a/img833/4191/p976.jpg
Select the other arrows and delete them.


7.2) Insert Text
7.2.1) Click the Second Frame in the Frame Navigation Panel.


7.2.2) Click the areas as shown below to insert Texts object to match the example at http://imageshack.us/a/img407/3373/cyd7.jpg .


7.3) Insert Image
7.3.1) Click Insert/Image...


7.3.2) When the Browse Dialog Box pops up, enter "Prezi Template" in the search box.


7.3.3) A strip of template images appear. Use Up/Down arrow key or Mouse Scroller to move between the items.


7.3.4) Resize the image to fit to the area.


8) To share the presentation,  Click Share/Online Presentation


8.1) Copy the link and share with others


8.2) This example for this tutorial can be viewed at http://prezi.com/3w3zrchskaon/present/?auth_key=98h6fj2&follow=7gtmumnmb71j