Labels

Learn the powerful enterprise adaptable database:

Getting Started With ADABAS & Natural

Tuesday, February 12, 2013

Laravel - Getting UniServer Ready For Laravel Applications


- Laravel requires a web server environment and will run in Apache, IIS, and Nginx easily.
- Laravel should run in any server environment that supports PHP. The easiest way to
set up a local webserver for development is to install XAMPP (Windows), MAMP (Mac
OSX), or Apache with PHP5 on through a package manager on Linux.
- Laravel is written in the PHP scripting language. Currently, Laravel v3.2.5 requires a
minimum of PHP v5.3 to run.
(PAGE 5)
1) Web application development is very dynamic and flexible.
1.1.) Dynamic → Keeps on changing and improving.
1.2.) Flexible → Many ways of getting the same output.
2) For the purpose of Laravel Framework experimentation, we will be using the following software tools:
2.1.) UniServer (downloadable from http://www.uniformserver.com/  )
2.2.) Notepad++ (downloadable from http://portableapps.com/apps/development/notepadpp_portable )
3) As a prerequisite, a person wishes to learn Laravel should have some backgrounds in:
3.1.) PHP codes
3.2.) DOS/Shell commands
4. Running a HTTP server.
4.1) Download UniServer, extract it to a proper location (e.g. c:\z\dev\  )
4.2) Observe the contents of UniServer.
4.3) Run UniServer by Double-Clicking the “Start_as_program.exe
4.4) Answer No for password change option.
4.5) Answer Yes to disable password check prompt in the future.
4.6) If you receive a warning message that port 443 is used by other program, Click Server Configuration/Apache/Edit httpd-ssl.conf and change “443” to “4431”.
4.7) Click Start Both button and Check that Apache and MySQL are running.
If Windows Firewall pops up, select the option to unblock Apache and MySQL.
4.7) Click View www.
4.7.1) A web browser should pop up and display the URL http://localhost
4.7.2) Replace the url with the number 127.0.0.1
4.8) From here, we have observed a few things:
4.8.1) Extracting UniServer to C:\Z\DEV\ .
4.8.2) Run “Start_As_A_Program.exe” .
4.8.3) Warning to Change MySQL Password .
4.8.4) Warning to Change Port 443 etc.
4.8.5) Option to disable Warnings in future runs.
4.8.6) “Start Both” button.
4.8.7) “View www” button.
4.8.8) Localhost host name.
4.8.9) 127.0.0.1 IP number for Localhost.
Read more about localhost and 127.0.0.1 at http://en.wikipedia.org/wiki/Localhost 
5) Check PHP Server Configuration.
5.1) Go to UniServer Control Panel.
5.2) Click View phpinfo.
5.3) Check that the PHP version supports Laravel and Virtual Directory

- We need to choose a host name for our example application. This is our first application and we're working on our local development environment, so let's usehttp://mysite.dev.
- an example of host IP and and host name configuration setting:
127.0.0.1 mysite.dev
- In Linux and OSX, simply add the above line to your /etc/hosts file:
- Windows users should add that line to their c:\windows\system32\drivers\etc\ hosts file.
- Now you should be able to ping myfirst.dev and see that it resolves to 127.0.0.1.
(PAGE 5)
6. Create new hostname, mysite.dev .
6.1) We will create a special hostname for our application. This is called a virtual host. This requires two step; 1) Edit Windows hosts file, 2) Configure Apache Virtual host file.
6.2) Run Notepad as an administrator.
6.3) Open C:\Windows\System32\drivers\etc\hosts.
6.4) Look for the entry 127.0.0.1
6.5) Add a new entry (Web Address such as mysite.dev)
6.6) Save the file and restart your PC.
6.7) Browse mysite.dev. You should see the previous page loaded at this address.
6.8) Run Command Window and type ping mysite.dev. Notice that the hostname resolves to 127.0.0.1.
7) Up to this point, we have:
7.1) Prepared the HTTP server to run Laravel application.
7.2) Prepared a virtual host name mysite.dev as the web address of our Laravel application. (Using Virtual Host is practical when you want to store many sites on the same physical server. In addition to this, Virtual Hosts will help us to keep our tutorial exercises on separate directories)

The easiest way to download Laravel is as a compressed package from
Alternatively, you can download Laravel by cloning its git repository from GitHub.com
with the following command.
git clone git@github.com:laravel/laravel.git
It would be better that you download the most current stable build.
Extract the contents of the compressed package into the directory that you store your
web-applications.
E.g C:\Z\Dev\UniServer\vhosts\a.
(PAGE 5)
8) Creating Laravel Application Directory.
8.1) We will create a dedicated directory for mysite.dev (This is also called virtual host directory. Whenever a web client browse mysite.dev, the server will look for the applications at this directory).
8.2) Using Windows File Explorer, Go to UniServer root directory (e.g. C:\Z\Dev\UniServer ).
8.3) Create a new directory “vhosts” (if it doesn’t exist).
8.4) Extract Laravel to a folder “a” as shown below.
8.5) Take note of the full path to Laravel application files and directories (We will call this as  {Laravel Root} ) (e.g. C:\Z\Dev\UniServer\vhosts\a )
8.6) Check {Laravel Root}\public\.htaccess file.
It would be like follows:
# Apache configuration file
# http://httpd.apache.org/docs/2.2/mod/quickreference.html
# Note: ".htaccess" files are an overhead for each request. This logic should
# be placed in your Apache config whenever possible.
# http://httpd.apache.org/docs/2.2/howto/htaccess.html
# Turning on the rewrite engine is necessary for the following rules and
# features. "+FollowSymLinks" must be enabled for this to work symbolically.
<IfModule mod_rewrite.c>
        Options +FollowSymLinks
        RewriteEngine On
</IfModule>
# For all files not found in the file system, reroute the request to the
# "index.php" front controller, keeping the query string intact
<IfModule mod_rewrite.c>
        RewriteCond %{REQUEST_FILENAME} !-f
        RewriteCond %{REQUEST_FILENAME} !-d
        RewriteRule ^(.*)$ index.php/$1 [L]
</IfModule>
9) Register Laravel Root as UniServer Virtual Host.
9.1) On UniServer Control Panel, click Server Configuration\Apache\Apache Vhosts.
9.2) A Virtual Hosts Dialog Window pops up. Look at the List of Hosts section. Click localhost. The setup details will appear at the Virtual Host Setup section.
9.3) Click Cancel. The window is ready to register a new Virtual Host details.
9.4) Select Folder that points to {laravel home}\public\. Type Server Name. Click Confirm.
9.5) The configuration string is auto generated.
9.6) Take note of the configuration string:
<Directory "C:\Z\Dev\UniServer\vhosts\a">
  Options Indexes Includes
  AllowOverride All
  Require all granted
</Directory>
9.7) Click Create Vhost button. The new Virtual Host Name has been added to the list. You will be reminded to restart Apache Server.
9.8) Restart Both Apache and MySQL Server.
9.9) Browse mysite.dev
Look at the path. It is pointing to {laravel root}\a\...
9.10. Re-Check {Laravel Root}\public\.htaccess file.
Compare against step 8.6.
If the content has changed, rename it as .htaccess.bak .
Create a new .htaccess and copy the content in step 8.6  into it.
10) TRY: create an alternative directory for mysite.dev
10.1) duplicate folder a as b.
10.2) Set b as new directory for mysite.dev virtual hosts.
10.3) Restart server.
10.4)If you are successful, you should notice the new path displayed on the page

Saturday, February 2, 2013

Laravel - Creating and using Eloquent Models


1) This tutorial demonstrates the following:
A) Creating Eloquent Data Model
B) Routing to a closure
C) Creating record using Eloquent Data Model

2) Before starting this tutorial, it is recommended that you go through:
2a) GET and POST method in routes.php file


A) CREATING ELOQUENT DATA MODEL


1) Eloquent is an Object Relational Mapper (ORM) that allows you to work with your database objects and relationships using an eloquent and expressive syntax.

2) Create {laravel root}\application\models\user.php. Edit as follows.

<?php

class User extends Eloquent
{
public function set_password($string)
{
$this->set_attribute('password', Hash::make($string));
}
}


B) ROUTING TO A CLOSURE


1) Routing is the act of linking a URL to a function in your application.

2) Open {laravel root}\application\routes.php. Locate the following codes (line no. 35-38)


Route::get('/', function()
{
 return View::make('home.index');
});


3) Beneath the above codes, add the following codes and save the file.


Route::get('createTest',function()
{
        //insert new record 
 return "The test user has been saved to the database.";
});


4) Browse {laravel home}/createTest


5) Check the content of the users table in laraveldb


mysql> select * from users;
Empty set (0.00 sec)

mysql>


C) CREATING A RECORD USING ELOQUENT DATA MODEL


1) Open {laravel root}\application\routes.php. Locate the following codes "//insert new record"

2) Replace those codes with the following underlined codes.


Route::get('createTest',function()
{
 $user = new User;
 $user->email = "test1@test.com";
 $user->real_name = "Test Account";
 $user->password = "test";
 $user->save();
 return "The test user has been saved to the database.";
});


4) Browse {laravel home}/createTest


5) Check the content of the users table in laraveldb


mysql> select id,email,real_name from users;
+----+----------------+--------------+
| id | email          | real_name    |
+----+----------------+--------------+
|  1 | test1@test.com | Test Account |
+----+----------------+--------------+
1 row in set (0.00 sec)

mysql>


Laravel - Creating Table Migrations


1) Laravel has its own way of creating data tables and performing rollback. This is called Migration.

2) Migration works is done via PHP CLI and artisan script command

3) Install the Migration table to the laraveldb.

3a) Run Command Window. Change directory to {laravel root}.

3b) Ensure that you have registered PHP execution path in Windows Environment. If you are not sure, follow this tutorial.

3c) Run Install command.

3a) Type php artisan migrate:install

3b) Type php artisan migrate:make create_users_table


>php artisan migrate:install
Migration table created successfully.

>php artisan migrate:make create_users_table
Great! New migration created!


4) Edit the table migration settings.

4a) Open {laravel root}\application\migrations\2013_02_02_192721_create_users_table.php


4b) Edit as follows:


<?php

class Create_Users_Table {

 /**
  * Make changes to the database.
  *
  * @return void
  */
 public function up()
 {
  Schema::create('users', function($table)
  {
  $table->increments('id');
  $table->string('email');
  $table->string('real_name');
  $table->string('password');
  $table->timestamps();
         });
 }

 /**
  * Revert the changes to the database.
  *
  * @return void
  */
 public function down()
 {
  Schema::drop('users');
 }

}


5) Run migration
(a table migration file is created)

>php artisan migrate
Migrated: application/2013_02_02_192721_create_users_table


6) Check the newly created table in laraveldb
(the users table has been created)
(the users table properties is according to the definition in table migration file)
>mysql -h localhost -u laraveladmin -p
Enter password: ********
Welcome to the MySQL monitor.  Commands end with ; or \g.
Your MySQL connection id is 527
Server version: 5.5.27 MySQL Community Server (GPL)

Copyright (c) 2000, 2011, Oracle and/or its affiliates. All rights reserved.

Oracle is a registered trademark of Oracle Corporation and/or its
affiliates. Other names may be trademarks of their respective
owners.

Type 'help;' or '\h' for help. Type '\c' to clear the current input statement.

mysql> use laraveldb;
Database changed
mysql> show tables;
+---------------------+
| Tables_in_laraveldb |
+---------------------+
| laravel_migrations  |
| users               |
+---------------------+
2 rows in set (0.00 sec)

mysql> select * from laravel_migrations;
+-------------+----------------------------------------+-------+
| bundle      | name                                   | batch |
+-------------+----------------------------------------+-------+
| application | 2013_02_02_192721_create_users_table   |     1 |
+-------------+----------------------------------------+-------+
1 rows in set (0.00 sec)

mysql> select * from users;
Empty set (0.00 sec)
mysql> describe users;
+------------+------------------+------+-----+---------+----------------+
| Field      | Type             | Null | Key | Default | Extra          |
+------------+------------------+------+-----+---------+----------------+
| id         | int(10) unsigned | NO   | PRI | NULL    | auto_increment |
| email      | varchar(200)     | NO   |     | NULL    |                |
| real_name  | varchar(200)     | NO   |     | NULL    |                |
| password   | varchar(200)     | NO   |     | NULL    |                |
| created_at | datetime         | NO   |     | NULL    |                |
| updated_at | datetime         | NO   |     | NULL    |                |
+------------+------------------+------+-----+---------+----------------+
6 rows in set (0.01 sec)

mysql>


7) Perform a migration rollback


>php artisan migrate:rollback
Rolled back: application/2013_02_02_192721_create_users_table


8) Check the effect of migration rollback in MySQL Command Window
(the users table has been dropped)


mysql> show tables;
+---------------------+
| Tables_in_laraveldb |
+---------------------+
| laravel_migrations  |
+---------------------+
1 rows in set (0.00 sec)

mysql>


9) Run migration again (Step 5)


>php artisan migrate
Migrated: application/2013_02_02_192721_create_users_table


Laravel - Configuring Database


1) Database is an essential support for many applications.

2) Laravel provides a database configuration file that allows the developer to easily create connection to the database server such as sqlite, mysql, pgsql, and sqlserv).

3) Open {laravel root}\application\config\database.php.

4) Scroll down to Default Database Connection (e.g. Line no. 35++). Notice that the default database is mysql.


5) Scroll down to Database Connections (e.g. Line no. 49++). Look for mysql connection (e.g. Line no. 70).

5a) Edit your mysql database connections. Take note of the host, database, username and password.


6) Create laraveldb and laraveladmin in MySQL. We will be using Command Window as it provides a quick and flexible way of achieving our task objectives.

(Create Database Setup)
6a) Run a Command Window.
6b) Log in to MySQL as root.
6c) Create a new database, laraveldb
6d) Create a user laraveladmin with password p@ssw0rd
6e) Grant ALL Privilege on laraveldb to laraveladmin
6f) Log out of MySQL.

(Check Database Setup)
6g) Run a Command Window (or continue from step 6f)
6h) Log in as laraveladmin.
6i) Check available databases.


>mysql -u root
Welcome to the MySQL monitor.  Commands end with ; or \g.
Your MySQL connection id is 519
Server version: 5.5.27 MySQL Community Server (GPL)

Copyright (c) 2000, 2011, Oracle and/or its affiliates. All rights reserved.

Oracle is a registered trademark of Oracle Corporation and/or its
affiliates. Other names may be trademarks of their respective
owners.

Type 'help;' or '\h' for help. Type '\c' to clear the current input statement.

mysql> show databases;
+--------------------+
| Database           |
+--------------------+
| information_schema |
| cdcol              |
| mysql              |
| performance_schema |
| phpmyadmin         |
| test               |
| webauth            |
+--------------------+
7 rows in set (0.00 sec)

mysql> create database laraveldb;
Query OK, 1 row affected (0.00 sec)

mysql> create user 'laraveladmin'@'localhost' identified by 'p@ssw0rd';
Query OK, 0 rows affected (0.00 sec)

mysql> grant all privileges on laraveldb.* to 'laraveladmin'@'localhost' identif
ied by 'p@ssw0rd';
Query OK, 0 rows affected (0.00 sec)

mysql> show databases;
+--------------------+
| Database           |
+--------------------+
| information_schema |
| cdcol              |
| laraveldb          |
| mysql              |
| performance_schema |
| phpmyadmin         |
| test               |
| webauth            |
+--------------------+
8 rows in set (0.00 sec)

mysql> exit
Bye

>mysql -h localhost -u laraveladmin -p
Enter password: ********
Welcome to the MySQL monitor.  Commands end with ; or \g.
Your MySQL connection id is 520
Server version: 5.5.27 MySQL Community Server (GPL)

Copyright (c) 2000, 2011, Oracle and/or its affiliates. All rights reserved.

Oracle is a registered trademark of Oracle Corporation and/or its
affiliates. Other names may be trademarks of their respective
owners.

Type 'help;' or '\h' for help. Type '\c' to clear the current input statement.

mysql> show databases;
+--------------------+
| Database           |
+--------------------+
| information_schema |
| laraveldb          |
| test               |
+--------------------+
3 rows in set (0.00 sec)

mysql>


7) Test Database connection using PHP scripts.

7a) Create {laravel root}\public\testdbcon.php
7b) Paste the following codes to testdbcon.php


<?php
if( isset($_POST['submit']) )
{
    echo $_POST['submit'];


// The variables have not been adequately sanitized to protect against SQL Injection attacks: http://us3.php.net/mysql_real_escape_string

 $hostname = trim($_POST['hostname']);
 $username = trim($_POST['username']);
 $password = trim($_POST['password']);
 $database = trim($_POST['database']);

 $link = mysql_connect("$hostname", "$username", "$password");
  if (!$link) {
   echo "<p>Could not connect to the server '" . $hostname . "'</p>\n";
         echo mysql_error();
  }else{
   echo "<p>Successfully connected to the server '" . $hostname . "'</p>\n";
//   printf("MySQL client info: %s\n", mysql_get_client_info());
//   printf("MySQL host info: %s\n", mysql_get_host_info());
//   printf("MySQL server version: %s\n", mysql_get_server_info());
//   printf("MySQL protocol version: %s\n", mysql_get_proto_info());
  }
 if ($link && !$database) {
  echo "<p>No database name was given. Available databases:</p>\n";
  $db_list = mysql_query("SHOW DATABASES");
  echo "<pre>\n";
  while ($row = mysql_fetch_array($db_list)) {
       echo $row['Database'] . "\n";
  }
  echo "</pre>\n";
 }
 if ($database) {
    $dbcheck = mysql_select_db("$database");
  if (!$dbcheck) {
         echo mysql_error();
  }else{
   echo "<p>Successfully connected to the database '" . $database . "'</p>\n";
   // Check tables
   
   $result = mysql_query("SHOW TABLES FROM ".$database);
   
   if (mysql_num_rows($result)!=FALSE){
   
    echo "<p>Available tables:</p>\n";
    echo "<pre>\n";
    while ($row = mysql_fetch_row($result)) {
     echo "{$row[0]}\n";
    }
    echo "</pre>\n";
    
   } else {
    echo "<p>The database '" . $database . "' contains no tables.</p>\n";
    //echo mysql_error();
   
   }
  }
 }
echo "<a href=".$_SERVER['PHP_SELF'].">Back</a>";
}


else { ?>

<h1>MySQL connection test</h1>

<form action="<?php echo $_SERVER['PHP_SELF']; ?>?action=test" id="connection" method="post">
   Hostname:<input name="hostname" type="text" /><br/>
   Username:<input name="username" type="text" /><br/>   
   Password:<input name="password" type="text" /><br/>   
   Database:<input name="database" type="text" /><br/>   
   <input type='hidden' name='submit' />
   <input name="submit" type="submit" value="Submit">
</form>


<?php } ?>


7c) Browse {laravel home}\testdbcon.php
7d) Enter connection details as stated in step 5a.


7e) You should get a success response.


7f) Remember to exclude testdbcon.php from Production Environment.


8) Database configuration has been set and tested. We are ready to start migrating Laravel data to the laraveldb.

MYSQL - Grant ALL Privileges On Database To New User via Command Lines


1) MySQL is The world's most popular open source database. It is bundled as part of the many LAMP/WAMP/MAMP packages including XAMPP.

2) XAMPP Package provides a PHP Script codes called PHPMyAdmin to help MySQL users to manage  databases via Graphical User Interface (GUI).

3) Despite the friendly PHPMyAdmin's GUI, some MySQL users find it more efficient to work with MySQL via command line. 

4) This tutorial provides steps to Grant ALL Privileges On Database To New User via Command Lines for  both Windows and Linux platform.

Most of the commands can be found at http://basic-steps.blogspot.com/2013/02/short-list-of-mysql-commands.html. Further reading on MySQL commands can be found at http://www.yolinux.com/TUTORIALS/LinuxTutorialMySQL.html .

5) Connect to the database:

> mysql -h localhost -u root -ppassword
Welcome to the MySQL monitor.  Commands end with ; or \g.
Your MySQL connection id is 130
Server version: 5.5.27 MySQL Community Server (GPL)
Copyright (c) 2000, 2011, Oracle and/or its affiliates. All rights reserved.
Oracle is a registered trademark of Oracle Corporation and/or its
affiliates. Other names may be trademarks of their respective
owners.
Type 'help;' or '\h' for help. Type '\c' to clear the current input statement.


(blue=your commandpurple=server response)
(-h = host parameter key)
(localhost = server name value)
(-u = user parameter key)
(root = username value)
(-p = password parameter key)
(password = password value)

6) Show list of databases on the server:

mysql> show databases;
+--------------------+
| Database           |
+--------------------+
| information_schema |
| cdcol              |
| mysql              |
| performance_schema |
| phpmyadmin         |
| test               |
| webauth            |
+--------------------+
7 rows in set (0.00 sec)


7) Create a new database, myfirstdb:

mysql> create database myfirstdb;
Query OK, 1 row affected (0.00 sec)


8) Show list of databases:

mysql> show databases;
+--------------------+
| Database           |
+--------------------+
| information_schema |
| cdcol              |
| myfirstdb          |
| mysql              |
| performance_schema |
| phpmyadmin         |
| test               |
| webauth            |
+--------------------+
8 rows in set (0.00 sec)


9) Create a new user, myfirstuser, identified by, p@ssword

mysql> CREATE USER 'myfirstuser'@'localhost' IDENTIFIED BY 'p@ssw0rd';
Query OK, 0 rows affected (0.00 sec)


10) Grant ALL privilege for myfirstdb to myfirstuser.

mysql> GRANT ALL PRIVILEGES ON myfirstdb.* TO 'myfirstuser'@'localhost' IDENTIFI
ED BY 'p@ssw0rd';
Query OK, 0 rows affected (0.00 sec)


11) Exit (root user) from mysql

mysql> exit;
Query OK, 0 rows affected (0.00 sec)


12) Login as myfirstuser@localhost. Enter password when prompted.

>mysql -h localhost -u myfirstuser -p
Enter password: ********
Welcome to the MySQL monitor.  Commands end with ; or \g.
Your MySQL connection id is 324
Server version: 5.5.27 MySQL Community Server (GPL)

Copyright (c) 2000, 2011, Oracle and/or its affiliates. All rights reserved.

Oracle is a registered trademark of Oracle Corporation and/or its
affiliates. Other names may be trademarks of their respective
owners.

Type 'help;' or '\h' for help. Type '\c' to clear the current input statement.


13) Show list of databases accessible by this user.


mysql> show databases;
+--------------------+
| Database           |
+--------------------+
| information_schema |
| myfirstdb          |
| test               |
+--------------------+
3 rows in set (0.00 sec)

mysql>


14) Test connection via PHP Script.
Create a PHP test script (e.g. testdbconnect.php) and insert the following codes to it. 
Save it to the public folder (REMEMBER: When you are done, delete this file)


<?php
if( isset($_POST['submit']) )
{
    echo $_POST['submit'];


// The variables have not been adequately sanitized to protect against SQL Injection attacks: http://us3.php.net/mysql_real_escape_string

 $hostname = trim($_POST['hostname']);
 $username = trim($_POST['username']);
 $password = trim($_POST['password']);
 $database = trim($_POST['database']);

 $link = mysql_connect("$hostname", "$username", "$password");
  if (!$link) {
   echo "<p>Could not connect to the server '" . $hostname . "'</p>\n";
         echo mysql_error();
  }else{
   echo "<p>Successfully connected to the server '" . $hostname . "'</p>\n";
//   printf("MySQL client info: %s\n", mysql_get_client_info());
//   printf("MySQL host info: %s\n", mysql_get_host_info());
//   printf("MySQL server version: %s\n", mysql_get_server_info());
//   printf("MySQL protocol version: %s\n", mysql_get_proto_info());
  }
 if ($link && !$database) {
  echo "<p>No database name was given. Available databases:</p>\n";
  $db_list = mysql_query("SHOW DATABASES");
  echo "<pre>\n";
  while ($row = mysql_fetch_array($db_list)) {
       echo $row['Database'] . "\n";
  }
  echo "</pre>\n";
 }
 if ($database) {
    $dbcheck = mysql_select_db("$database");
  if (!$dbcheck) {
         echo mysql_error();
  }else{
   echo "<p>Successfully connected to the database '" . $database . "'</p>\n";
   // Check tables
   
   $result = mysql_query("SHOW TABLES FROM ".$database);
   
   if (mysql_num_rows($result)!=FALSE){
   
    echo "<p>Available tables:</p>\n";
    echo "<pre>\n";
    while ($row = mysql_fetch_row($result)) {
     echo "{$row[0]}\n";
    }
    echo "</pre>\n";
    
   } else {
    echo "<p>The database '" . $database . "' contains no tables.</p>\n";
    //echo mysql_error();
   
   }
  }
 }
echo "<a href=".$_SERVER['PHP_SELF'].">Back</a>";
}


else { ?>

<h1>MySQL connection test</h1>

<form action="<?php echo $_SERVER['PHP_SELF']; ?>?action=test" id="connection" method="post">
   Hostname:<input name="hostname" type="text" /><br/>
   Username:<input name="username" type="text" /><br/>   
   Password:<input name="password" type="text" /><br/>   
   Database:<input name="database" type="text" /><br/>   
   <input type='hidden' name='submit' />
   <input name="submit" type="submit" value="Submit">
</form>


<?php } ?>


15) Browse the URL testdbconnect.php


16) Upon successful connection, you will get success response.


Short List of MySQL Commands


Conventions used here:

  • MySQL key words are shown in CAPS
  • User-specified names are in small letters
  • Optional items are enclosed in square brackets [ ]
  • Items in parentheses must appear in the command, along with the parentheses
  • Items that can be repeated as often as desired are indicated by an ellipsis ...

Quoting in MySQL statments

  • Don't quote database, table, or column names
  • Don't quote column types or modifiers
  • Don't quote numerical values
  • Quote (single or double) non-numeric values
  • Quote file names and passwords
  • User names are NOT quoted in GRANT or REVOKE statements, but they are quoted in other statements.


General Commands
USE database_name
     Change to this database. You need to change to some database when you first connect to MySQL.
 
SHOW DATABASES
     Lists all MySQL databases on the system.
 
SHOW TABLES [FROM database_name]
     Lists all tables from the current database or from the database given in the command.
 
DESCRIBE table_name
SHOW FIELDS FROM table_name
SHOW COLUMNS FROM table_name
     These commands all give a list of all columns (fields) from the given table, along with column type and other info.
 
SHOW INDEX FROM table_name
     Lists all indexes from this tables.
 
SET PASSWORD=PASSWORD('new_password')
     Allows the user to set his/her own password.
 
 
Table Commands
CREATE TABLE table_name (create_clause1, create_clause2, ...)
     Creates a table with columns as indicated in the create clauses.
 
     create_clause
     column name followed by column type, followed optionally by modifiers. For example, "gene_id INT AUTO_INCREMENT PRIMARY KEY" (without the quotes) creates a column of type integer with the modifiers described below.
 
     create_clause modifiers
     
  • AUTO_INCREMENT : each data record is assigned the next sequential number when it is given a NULL value.
  • PRIMARY KEY : Items in this column have unique names, and the table is indexed automatically based on this column. One column must be the PRIMARY KEY, and only one column may be the PRIMARY KEY. This column should also be NOT NULL.
  • NOT NULL : No NULL values are allowed in this column: a NULL generates an error message as the data is inserted into the table.
  • DEFAULT value : If a NULL value is used in the data for this column, the default value is entered instead.
 
DROP TABLE table_name
     Removes the table from the database. Permanently! So be careful with this command!
 
ALTER TABLE table_name ADD (create_clause1, create_clause2, ...)
     Adds the listed columns to the table.
 
ALTER TABLE table_name DROP column_name
     Drops the listed columns from the table.
 
ALTER TABLE table_name MODIFY create_clause
     Changes the type or modifiers to a column. Using MODIFY means that the column keeps the same name even though its type is altered. MySQL attempts to convert the data to match the new type: this can cause problems.
 
ALTER TABLE table_name CHANGE column_name create_clause
     Changes the name and type or modifiers of a column. Using CHANGE (instead of MODIFY) implies that the column is getting a new name.
 
ALTER TABLE table_name ADD INDEX [index_name] (column_name1, column_name2, ...)
CREATE INDEX index_name ON table_name (column_name1, column_name2, ...)
     Adds an index to this table, based on the listed columns. Note that the order of the columns is important, because additional indexes are created from all subsets of the listed columns reading from left to write. The index name is optional if you use ALTER TABLE, but it is necesary if you use CREATE INDEX. Rarely is the name of an index useful (in my experience).
 
 
Data Commands
INSERT [INTO] table_name VALUES (value1, value2, ...)
     Insert a complete row of data, giving a value (or NULL) for every column in the proper order.
 
INSERT [INTO] table_name (column_name1, column_name2, ...) VALUES (value1, value2, ...)
INSERT [INTO] table_name SET column_name1=value1, column_name2=value2, ...
     Insert data into the listed columns only. Alternate forms, with the SET form showing column assignments more explicitly.
 
INSERT [INTO] table_name (column_name1, column_name2, ...) SELECT list_of_fields_from_another_table FROM other_table_name WHERE where_clause
     Inserts the data resulting from a SELECT statement into the listed columns. Be sure the number of items taken from the old table match the number of columns they are put into!
 
DELETE FROM table_name WHERE where_clause
     Delete rows that meet the conditions of the where_clause. If the WHERE statement is omitted, the table is emptied, although its structure remains intact.
 
UPDATE table_name SET column_name1=value1, column_name2=value2, ... [WHERE where_clause]
     Alters the data within a column based on the conditions in the where_clause.
 
LOAD DATA LOCAL INFILE 'path to external file' INTO TABLE table_name
     Loads data from the listed file into the table. The default assumption is that fields in the file are separated by tabs, and each data record is separated from the others by a newline. It also assumes that nothing is quoted: quote marks are considered to be part of the data. Also, it assumes that the number of data fields matches the number of table columns. Columns that are AUTO_INCREMENT should have NULL as their value in the file.
 
LOAD DATA LOCAL INFILE 'path to external file' [FIELDS TERMINATED BY 'termination_character'] [FIELDS ENCLOSED BY 'quoting character'] [LINES TERMINATED BY 'line termination character'] FROM table_name
     Loads data from the listed file into the table, using the field termination character listed (default is tab \t), and/or the listed quoting character (default is nothing), and/or the listed line termination chacracter (default is a newline \n).
 
SELECT column_name1, column_name2, ... INTO OUTFILE 'path to external file' [FIELDS TERMINATED BY 'termination_character'] [FIELDS ENCLOSED BY 'quoting character'] [LINES TERMINATED BY 'line termination character'] FROM table_name [WHERE where_clause]
     Allows you to move data from a table into an external file. The field and line termination clauses are the same as for LOAD above. Several tricky features:
  1. Note the positions of the table_name and where_clause, after the external file is given.
  2. You must use a complete path, not just a file name. Otherwise MySQL attempts to write to the directory where the database is stored, where you don't have permission to write.
  3. The user who is writing the file is 'mysql', not you! This means that user 'mysql' needs permission to write to the directory you specify. The best way to do that is to creat a new directory under your home directory, then change the directory's permission to 777, then write to it. For example: mkdir mysql_outputchmod 777 mysql_output.


Privilege Commands
Most of the commands below require MySQL root access
 
GRANT USAGE ON *.* TO user_name@localhost [IDENTIFIED BY 'password']
     Creates a new user on MySQL, with no rights to do anything. The IDENTIFED BY clause creates or changes the MySQL password, which is not necessarily the same as the user's system password. The @localhost after the user name allows usage on the local system, which is usually what we do; leaving this off allows the user to access the database from another system. User name NOT in quotes.
 
GRANT SELECT ON *.* TO user_name@localhost
     In general, unless data is supposed to be kept private, all users should be able to view it. A debatable point, and most databases will only grant SELECT privileges on particular databases. There is no way to grant privileges on all databses EXCEPT specifically enumerated ones.
 
GRANT ALL ON database_name.* TO user_name@localhost
     Grants permissions on all tables for a specific database (database_name.*) to a user. Permissions are for: ALTER, CREATE, DELETE, DROP, INDEX, INSERT, SELECT, UPDATE.
 
FLUSH PRIVILEGES
     Needed to get updated privileges to work immediately. You need RELOAD privileges to get this to work.
 
SET PASSWORD=PASSWORD('new_password')
     Allows the user to set his/her own password.
 
REVOKE ALL ON [database_name.]* FROM user_name@localhost
     Revokes all permissions for the user, but leaves the user in the MySQL database. This can be done for all databases using "ON *", or for all tables within a specific databse, using "ON database_name.*".
 
DELETE FROM mysql.user WHERE user='user_name@localhost'
     Removes the user from the database, which revokes all privileges. Note that the user name is in quotes here.
 
UPDATE mysql.user SET password=PASSWORD('my_password') WHERE user='user_name'
     Sets the user's password. The PASSWORD function encrypts it; otherwise it will be in plain text.
 
SELECT user, host, password, select_priv, insert_priv, shutdown_priv, grant_priv FROM mysql.user
     A good view of all users and their approximate privileges. If there is a password, it will by an encrytped string; if not, this field is blank. Select is a very general privlege; insert allows table manipulation within a database; shutdown allows major system changes, and should only be usable by root; the ability to grant permissions is separate from the others.
 
SELECT user, host, db, select_priv, insert_priv, grant_priv FROM mysql.db
     View permissions for individual databases.


copied from: http://www.bios.niu.edu/johns/bioinform/mysql_commands.htm

Friday, February 1, 2013

Laravel - GET and POST method in routes.php file


.
Two commonly used methods for a request-response between a client and server are: GET and POST.
GET - Requests data from a specified resource
POST - Submits data to be processed to a specified resource
1) The file routes.php represents the connection between your site's URLs and the functions that contain application logic for your site.
2) Using a text editor (e.g. notepad++), open {laravel root}\application\routes.php
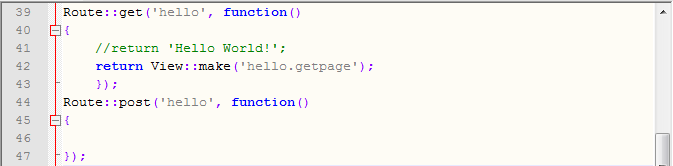
3) Look at code lines no. 14 to 18 above.
4) Copy the codes.
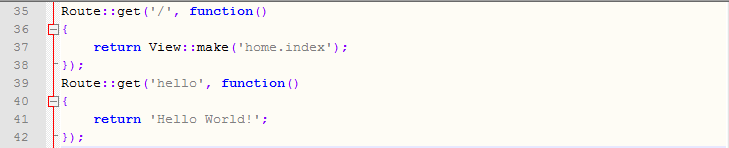
5) Locate the following code lines. (e.g. line no. 35 to 38)
6) Paste the copied codes to line beneath the above codes. (e.g. line no. 39 onwards.)
7) Browse your site's URLs, e.g. http://mysite.dev/hello
8) The newly inserted codes (e.g line no. 39 to 41) belongs to Get Method called 'hello'. Whenever the URL is requested, Laravel will call the method. The method contains a return statement that returns the string "Hello World!".
9) Create a new folder and file --> {laravel root}\application\views\hello\getpage.blade.php  Type the following codes to getpage.blade.php:
9a) Take note that this HTML codes include a FORM that will send a POST METHOD request using an action parameter "hello". 10) Edit routes.php. Comment line 41 and insert line 42. Instead of returning a string, we instruct the server to return a view of the above file.
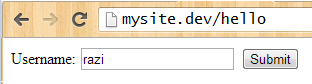
11) Browse http://mysite.dev/hello. You get a view of the file getpage.blade.php . Notice that the URL doesn't change.
12) Enter the username.
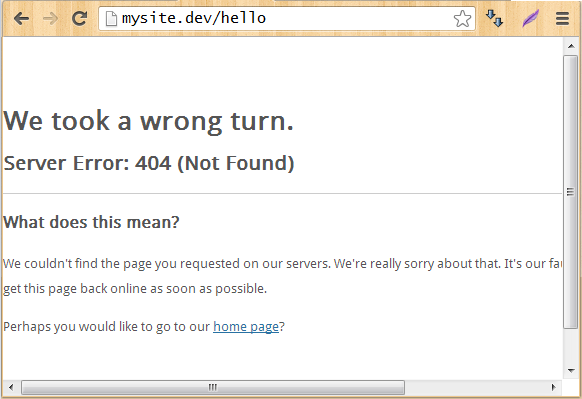
13) Click Submit. At this point, you may get a Server Error:404 (Not Found).
14) What happened?
14a) When you submit the form, the form send a POST request to the server.
14b) The server refers to the routes.php to look for the POST route.
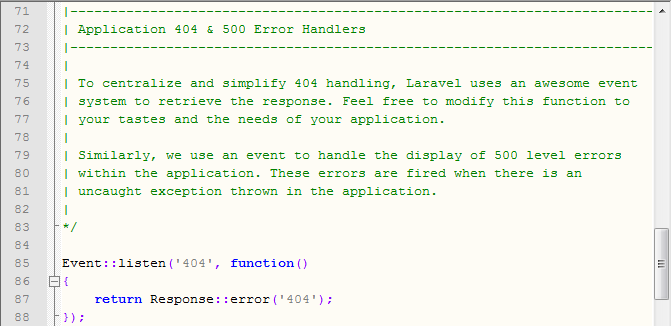
14c) At the moment, POST method has not yet been defined. So, routes.php respond with Application 404 error.
14d) An Error Response return an Error Page located at {laravel root}\application\views\error\404.php
15) Insert a POST route. Edit routes.php. Insert new lines (e.g. No 44 to 47)
16) Repeat steps 11 to 13. Instead of a 404 error page, you should get a blank page response now. That means, the post method is recognized but since it is an empty method, the browser doesn’t get anything in return.
17) To complete this tasks, create a page to respond to Submit event. Create a new  file --> {laravel root}\application\views\hello\postpage.blade.php  Type the following codes to postpage.blade.php:
18) Edit routes.php. Insert a new line in the Route::post method (e.g. Line 46)
18) Repeat steps 11 to 13. The server now responds with a Welcome page. The greeted name is picked up from the form's username in the previous page using PHP $_POST variable.
19) Using Laravel’s Input Class
Open {laravel root}\application\views\hello\postpage.blade.php
Edit the Welcome statement as below. You get the same output based on Laravel style.
20) TRY: Create a bye GET method to make a view of a bye form which will request a bye POST method and make a bye page.
.