
.
300 Create Ionic Sales Record Book Apps
Building On Codepen Platform
1) Create Startup Codes
Red colored codes will be removed later.
Blue colored codes are for mockup purpose.
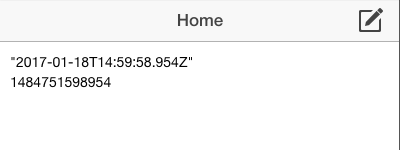
The startup codes generate a Single Ionic Page showing two typical date format ie String Format and Epoch Format. Date and time is separated with a capital T. UTC time is defined with a capital letter Z. If you want to modify the time relative to UTC, remove the Z and add +HH:MM or -HH:MM instead. (Refer http://www.w3schools.com/js/js_date_formats.asp )
HTML
<html>
<head>
<meta charset="utf-8">
<title>Diary</title>
<meta name="viewport" content="initial-scale=1, maximum-scale=1, user-scalable=no, width=device-width">
<!-- Internal Library
<link href="lib/ionic/css/ionic.css" rel="stylesheet">
<script src="lib/ionic/js/ionic.bundle.js"></script>
-->
<!-- Cloud Library -->
<link href="//code.ionicframework.com/nightly/css/ionic.css" rel="stylesheet">
<script src="//code.ionicframework.com/nightly/js/ionic.bundle.js"></script>
<!-- Needed for Cordova/PhoneGap (will be a 404 during development) -->
<script src="cordova.js"></script>
</head>
<body ng-app="app">
<div>
<div>
<ion-nav-bar class="bar-stable">
<ion-nav-back-button></ion-nav-back-button>
</ion-nav-bar>
<ion-nav-view></ion-nav-view>
</div>
</div>
<script id="home.html" type="text/ng-template">
<ion-view title="Home" id="page1">
<ion-nav-buttons side="right" class="has-header">
<button class="button button-icon" ng-click="insertRecord()">
<i class="icon ion-compose"></i>
</button>
</ion-nav-buttons>
<ion-content padding="true" class="has-header">
{{date}}
<br/> {{date.getTime()}}
</ion-content>
</ion-view>
</script>
</body>
</html>
|
JS
angular.module('app', ['ionic'])
.controller('homeCtrl', ['$scope', '$stateParams', '$ionicModal',
function ($scope, $stateParams, $ionicModal) {
$scope.date=new Date();
}])
.config(function($stateProvider, $urlRouterProvider) {
// Ionic uses AngularUI Router which uses the concept of states
// Learn more here: https://github.com/angular-ui/ui-router
// Set up the various states which the app can be in.
// Each state's controller can be found in controllers.js
$stateProvider
.state('home', {
url: '/page1',
templateUrl: 'home.html',
controller: 'homeCtrl'
})
$urlRouterProvider.otherwise('/page1')
});
|
300 Create Ionic Sales Record Book Apps 1
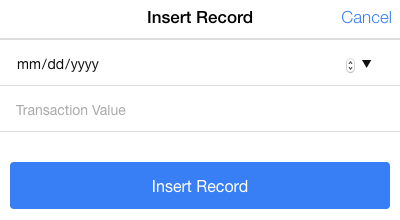
2) Add Dialog
HTML
<html>
<head>
<meta charset="utf-8">
<title>Diary</title>
<meta name="viewport" content="initial-scale=1, maximum-scale=1, user-scalable=no, width=device-width">
<!-- Internal Library
<link href="lib/ionic/css/ionic.css" rel="stylesheet">
<script src="lib/ionic/js/ionic.bundle.js"></script>
-->
<!-- Cloud Library -->
<link href="//code.ionicframework.com/nightly/css/ionic.css" rel="stylesheet">
<script src="//code.ionicframework.com/nightly/js/ionic.bundle.js"></script>
<!-- Needed for Cordova/PhoneGap (will be a 404 during development) -->
<script src="cordova.js"></script>
</head>
<body ng-app="app">
<div>
<div>
<ion-nav-bar class="bar-stable">
<ion-nav-back-button></ion-nav-back-button>
</ion-nav-bar>
<ion-nav-view></ion-nav-view>
</div>
</div>
<script id="home.html" type="text/ng-template">
<ion-view title="Home" id="page1">
<ion-nav-buttons side="right" class="has-header">
<button class="button button-icon" ng-click="insertRecord()">
<i class="icon ion-compose"></i>
</button>
</ion-nav-buttons>
<ion-content padding="true" class="has-header">
{{date}}
<br/>
{{date.getTime()}}
</ion-content>
</ion-view>
</script>
<script id="insertRecord.html" type="text/ng-template">
<div class="modal">
<!-- Modal header bar -->
<ion-header-bar class="bar-secondary">
<h1 class="title">Insert Record</h1>
<button class="button button-clear button-positive" ng-click="closeInsertRecord()">Cancel</button>
</ion-header-bar>
<!-- Modal content area -->
<ion-content>
<form ng-submit="submitInsertRecord(record)">
<div class="list">
<label class="item item-input">
<input type="date" placeholder="Transaction Date" ng-model="record.date">
</label>
<label class="item item-input">
<input type="text" placeholder="Transaction Value" ng-model="record.value">
</label>
</div>
<div class="padding">
<button type="submit" class="button button-block button-positive">Insert Record</button>
</div>
</form>
</ion-content>
</div>
</script>
</body>
</html>
|
JS
angular.module('app', ['ionic'])
.controller('homeCtrl', ['$scope', '$stateParams', '$ionicModal',
function ($scope, $stateParams, $ionicModal) {
$scope.date=new Date();
// Create and load the Modal
$ionicModal.fromTemplateUrl('insertRecord.html', function(modal) {
$scope.insertRecordModal = modal;
}, {
scope: $scope,
animation: 'slide-in-up'
});
// Called when the form is submitted
$scope.submitInsertRecord = function(record) {
$scope.insertRecordModal.hide();
};
// Open our new task modal
$scope.insertRecord = function() {
$scope.insertRecordModal.show();
};
// Close the new task modal
$scope.closeInsertRecord = function() {
$scope.insertRecordModal.hide();
};
}])
.config(function($stateProvider, $urlRouterProvider) {
// Ionic uses AngularUI Router which uses the concept of states
// Learn more here: https://github.com/angular-ui/ui-router
// Set up the various states which the app can be in.
// Each state's controller can be found in controllers.js
$stateProvider
.state('home', {
url: '/page1',
templateUrl: 'home.html',
controller: 'homeCtrl'
})
$urlRouterProvider.otherwise('/page1')
});
|
300 Create Ionic Sales Record Book Apps 2
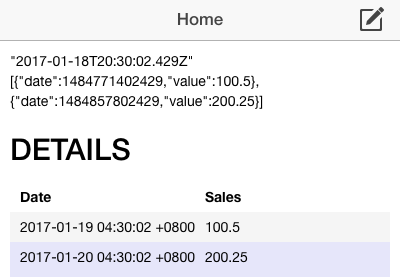
3) Add JSON Data Object to store user inputs.
HTML
<html>
<head>
<meta charset="utf-8">
<title>Diary</title>
<meta name="viewport" content="initial-scale=1, maximum-scale=1, user-scalable=no, width=device-width">
<!-- Internal Library
<link href="lib/ionic/css/ionic.css" rel="stylesheet">
<script src="lib/ionic/js/ionic.bundle.js"></script>
-->
<!-- Cloud Library -->
<link href="//code.ionicframework.com/nightly/css/ionic.css" rel="stylesheet">
<script src="//code.ionicframework.com/nightly/js/ionic.bundle.js"></script>
<!-- Needed for Cordova/PhoneGap (will be a 404 during development) -->
<script src="cordova.js"></script>
</head>
<body ng-app="app">
<div>
<div>
<ion-nav-bar class="bar-stable">
<ion-nav-back-button></ion-nav-back-button>
</ion-nav-bar>
<ion-nav-view></ion-nav-view>
</div>
</div>
<script id="home.html" type="text/ng-template">
<ion-view title="Home" id="page1">
<ion-nav-buttons side="right" class="has-header">
<button class="button button-icon" ng-click="insertRecord()">
<i class="icon ion-compose"></i>
</button>
</ion-nav-buttons>
<ion-content padding="true" class="has-header">
{{date}}
<br/>
{{details}}
<h2>DETAILS</h2>
<div class = "row">
<div class = "col"><b>Date</b></div>
<div class = "col"><b>Sales</b></div>
</div>
<div class = "row" ng-class-odd="'odd'" ng-class-even="'even'"
ng-repeat="detail in details"
>
<div class = "col">{{detail.date | date:'yyyy-MM-dd HH:mm:ss Z'}}</div>
<div class = "col">{{detail.value}}</div>
</div>
</ion-content>
</ion-view>
</script>
<script id="insertRecord.html" type="text/ng-template">
<div class="modal">
<!-- Modal header bar -->
<ion-header-bar class="bar-secondary">
<h1 class="title">Insert Record</h1>
<button class="button button-clear button-positive" ng-click="closeInsertRecord()">Cancel</button>
</ion-header-bar>
<!-- Modal content area -->
<ion-content>
<form ng-submit="submitInsertRecord(record)">
<div class="list">
<label class="item item-input">
<input type="date" placeholder="Transaction Date" ng-model="record.date">
</label>
<label class="item item-input">
<input type="text" placeholder="Transaction Value" ng-model="record.value">
</label>
</div>
<div class="padding">
<button type="submit" class="button button-block button-positive">Insert Record</button>
</div>
</form>
</ion-content>
</div>
</script>
</body>
</html>
|
CSS
.odd {
background-color: WhiteSmoke ;
}
.even {
background-color: Lavender ;
}
|
JS
angular.module('app', ['ionic'])
.controller('homeCtrl', ['$scope', '$stateParams', '$ionicModal',
function ($scope, $stateParams, $ionicModal) {
$scope.date=new Date();
// init
// var dataTrunk1={“details:[]};
var dataTrunk1={"details":[
{date:$scope.date.getTime(),value:100.50},
{date:$scope.date.getTime()+(24*60*60*1000 ),value:200.25}
]};
$scope.details = dataTrunk1.details;
// Create and load the Modal
$ionicModal.fromTemplateUrl('insertRecord.html', function(modal) {
$scope.insertRecordModal = modal;
}, {
scope: $scope,
animation: 'slide-in-up'
});
// Called when the form is submitted
$scope.submitInsertRecord = function(record) {
$scope.insertRecordModal.hide();
};
// Open our new task modal
$scope.insertRecord = function() {
$scope.insertRecordModal.show();
};
// Close the new task modal
$scope.closeInsertRecord = function() {
$scope.insertRecordModal.hide();
};
}])
.config(function($stateProvider, $urlRouterProvider) {
// Ionic uses AngularUI Router which uses the concept of states
// Learn more here: https://github.com/angular-ui/ui-router
// Set up the various states which the app can be in.
// Each state's controller can be found in controllers.js
$stateProvider
.state('home', {
url: '/page1',
templateUrl: 'home.html',
controller: 'homeCtrl'
})
$urlRouterProvider.otherwise('/page1')
});
|
300 Create Ionic Sales Record Book Apps 3
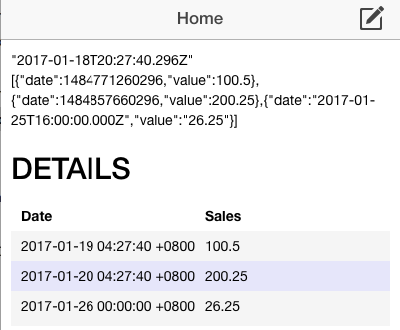
4) Add Codes To Insert New Record To JSON Data.
HTML
<html>
<head>
<meta charset="utf-8">
<title>Diary</title>
<meta name="viewport" content="initial-scale=1, maximum-scale=1, user-scalable=no, width=device-width">
<!-- Internal Library
<link href="lib/ionic/css/ionic.css" rel="stylesheet">
<script src="lib/ionic/js/ionic.bundle.js"></script>
-->
<!-- Cloud Library -->
<link href="//code.ionicframework.com/nightly/css/ionic.css" rel="stylesheet">
<script src="//code.ionicframework.com/nightly/js/ionic.bundle.js"></script>
<!-- Needed for Cordova/PhoneGap (will be a 404 during development) -->
<script src="cordova.js"></script>
</head>
<body ng-app="app">
<div>
<div>
<ion-nav-bar class="bar-stable">
<ion-nav-back-button></ion-nav-back-button>
</ion-nav-bar>
<ion-nav-view></ion-nav-view>
</div>
</div>
<script id="home.html" type="text/ng-template">
<ion-view title="Home" id="page1">
<ion-nav-buttons side="right" class="has-header">
<button class="button button-icon" ng-click="insertRecord()">
<i class="icon ion-compose"></i>
</button>
</ion-nav-buttons>
<ion-content padding="true" class="has-header">
{{date}}
<br/>
{{details}}
<h2>DETAILS</h2>
<div class = "row">
<div class = "col"><b>Date</b></div>
<div class = "col"><b>Sales</b></div>
</div>
<div class = "row" ng-class-odd="'odd'" ng-class-even="'even'"
ng-repeat="detail in details"
>
<div class = "col">{{detail.date | date:'yyyy-MM-dd HH:mm:ss Z'}}</div>
<div class = "col">{{detail.value}}</div>
</div>
</ion-content>
</ion-view>
</script>
<script id="insertRecord.html" type="text/ng-template">
<div class="modal">
<!-- Modal header bar -->
<ion-header-bar class="bar-secondary">
<h1 class="title">Insert Record</h1>
<button class="button button-clear button-positive" ng-click="closeInsertRecord()">Cancel</button>
</ion-header-bar>
<!-- Modal content area -->
<ion-content>
<form ng-submit="submitInsertRecord(record)">
<div class="list">
<label class="item item-input">
<input type="date" placeholder="Transaction Date" ng-model="record.date">
</label>
<label class="item item-input">
<input type="text" placeholder="Transaction Value" ng-model="record.value">
</label>
</div>
<div class="padding">
<button type="submit" class="button button-block button-positive">Insert Record</button>
</div>
</form>
</ion-content>
</div>
</script>
</body>
</html>
|
CSS
.odd {
background-color: WhiteSmoke ;
}
.even {
background-color: Lavender ;
}
|
JS
angular.module('app', ['ionic'])
.controller('homeCtrl', ['$scope', '$stateParams', '$ionicModal',
function ($scope, $stateParams, $ionicModal) {
$scope.date=new Date();
var dataTrunk1={"details":[
{date:$scope.date.getTime(),value:100.50},
{date:$scope.date.getTime()+(24*60*60*1000 ),value:200.25}
]};
$scope.details = dataTrunk1.details;
// Create and load the Modal
$ionicModal.fromTemplateUrl('insertRecord.html', function(modal) {
$scope.insertRecordModal = modal;
}, {
scope: $scope,
animation: 'slide-in-up'
});
// Called when the form is submitted
$scope.submitInsertRecord = function(record) {
$scope.details.push({
date: record.date,
value: record.value
});
$scope.insertRecordModal.hide();
record.date="";
record.value = "";
$scope.insertRecordModal.hide();
};
// Open our new task modal
$scope.insertRecord = function() {
$scope.insertRecordModal.show();
};
// Close the new task modal
$scope.closeInsertRecord = function() {
$scope.insertRecordModal.hide();
};
}])
.config(function($stateProvider, $urlRouterProvider) {
// Ionic uses AngularUI Router which uses the concept of states
// Learn more here: https://github.com/angular-ui/ui-router
// Set up the various states which the app can be in.
// Each state's controller can be found in controllers.js
$stateProvider
.state('home', {
url: '/page1',
templateUrl: 'home.html',
controller: 'homeCtrl'
})
$urlRouterProvider.otherwise('/page1')
});
|
300 Create Ionic Sales Record Book Apps 4
No comments:
Post a Comment